
The dryer vent is used to expose not only the moist air from the dryer but also any fuzz that can get if the lint filters. It is essential to have a tight connection when the hose is connected. Any leakage will allow both the lint and hot air that could produce condensation, could eventually lead to mold. You can use a fire retardant vent hose and elastic suspension clamps to make your appliance work cleanly and efficiently.
The dryer vent installation is quite easy to use, but they can also cause potentially six problems. Create a safe and reliable route for the flow of hot air, lint, and essential moisture to ensure the optimal performance of your dryer and protect your home from damage. So, you must be careful when you will install a dryer vent and replace your dryer vent hose.
How to Install a Dryer Vent: Full Instructions
Some key considerations can help you choose the best methods and materials for the vent dryers. For that, you must know how to install a dryer vent. Let’s start the process.
First step: Rotate the dryer vent at an angle so you can access the location of the dryer vent on the wall and the dryer vent connection on the back of the dryer.
Second step: Unplug the dryer from the 220-volt outlet to prevent accidental starting during the installation process.
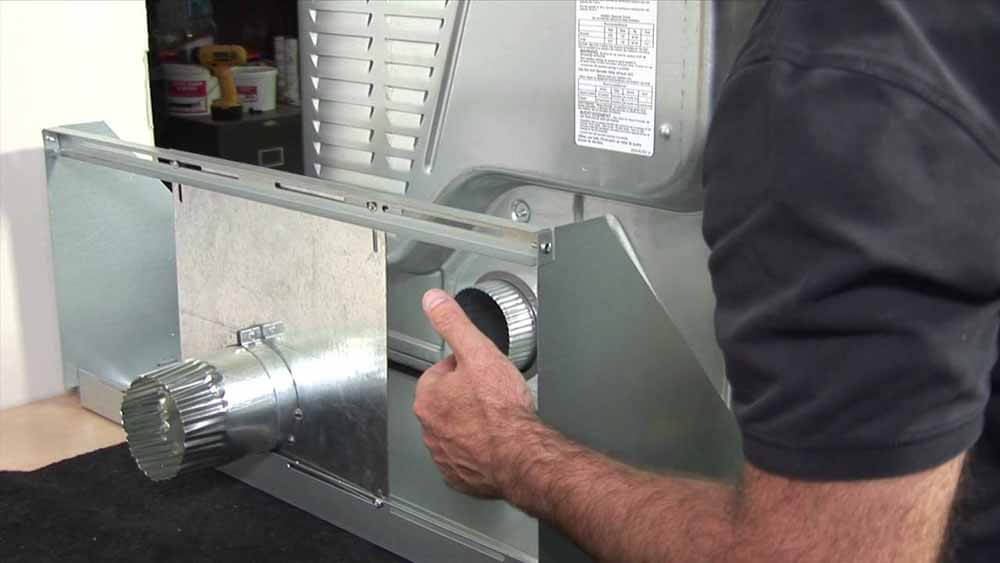
Third step: Press one of the hose clamps with the tongs to open it and run it over one end of the dryer hose. The clamp will have two tabs that, as they are tightened or one towards the other, the clamp will open. As it is released, the tension of the clamp will close. Slide the hose down about 6 inches from the end. Now, Slide the end of the hose over the dryer vent connection on the back of the dryer.
Fourth step: Close the open clamp with the clamps and slide about 2 inches from the end of the hose. Slowly release the pliers, and the tension of the spring is broken to the house, fix it invent connection of the dryer.
Fifth step: Repeat steps 3 and 4 to attach the other end to the wall vent the other hose clamp.
Sixth step: Plug the dryer into the 220-volt outlet and slide the dryer back to its original operating location.
Seventh step: Turn on the dryer and test for power.
Tips & Warnings
- Schedule regular cleaning of the dryer’s hose and dryer’s lint filter to help perform at its best.
- Elastic suspension clamps are typically easier to work with than screw down clamps, but both are effective.
- Avoid any kink or crush the hose, as this will cause the accumulation of lint and potentially a fire dryer.
Insulate a Dryer Vent
- Dryer ventilation hoses channel hot air from the dryer to the atmosphere. They also allow it to blow lint, fibers and other accumulations that float around a dryer out of the drying system. Connect the Dryer to the outside of the ventilation grille with a dryer hose. In colder climates, we must insulate these hoses to help prevent the formation of condensation on the outside of the hoses. This condensation can cause water damage, and electrical short-circuits if not handled properly.
- Unplug the dryer vent. Access the vent pipe of the dryer or the hose. This can be in an attic or basement. Follow the outlet at the base of the dryer. It is connected to the dryer hose to locate the body of the dryer hose.
- Measure the straight sides of the pipe with a tape measure. Wrap the tape around the diameter of the pipe and determine the size. Write these numbers. Cut a piece of insulation with the size of your measurements with the scissors.
- Wrap the insulation around the pipe. Secure in place with strong HVAC tape. Continue working along the pipe until there is insulation all the section of pipe. Plug the dryer in. Start a load in a short cycle. Observe the pipe and insulation while running the dryer and make sure that the insulation stays in place. Add more tape, if necessary.

Considerations
You can buy specialized air conditioning tape at hardware stores or plumbing. Installation of the correct ventilation hoses for the dryer and the working conduit is necessary to avoid the possibility of fire hazards. Factory and builders follow Laboratory States, UL, and codes on proper installation of dryer outlet hoses and ductwork. If the proper exhaust pipes are not installed, the chances of increasing the fire hazards due to accumulated lint from the dryer.
Dryer Hoses
See the dryer instruction guide. Each manufacturer suggests different exit hoses for the dryer approved in the laboratory states for your brand. Buying a non-UL approved dryer vent hose can increase the chances of a fire hazard. This information will be in the owner’s manual of your new dryer.
The installation of the hose Dryer
Buy the correct length and type of dryer vent hose to avoid possible fire hazards. All hoses, regardless of the UL code required, must be 23 inches to 8 feet. The minimum width of the hose must be at least 4 inches. The interior should be a smooth surface. The structure of the hose should be aluminum, steel, or spiral material. The material should not be white vinyl.
Installation of Duct
Connect the appropriate ducts to the ventilation dryer to avoid the possibility of fire risks. 2006 International Code of Mechanics and commentary inform owners of homes and builders to install ducts that comply with the UL 2158A standard. The maximum working length of the duct should be 25 feet long.
Conclusion
The Dryer vent installation is necessary for removing hazardous gases and moist air from the hose. By following the instructions that we described here, you can do it easily. In this working session, keep a 6-inch masonry power drill and other tools. And don’t forget about the safety. Always wear safety glasses and hand gloves to keep you safe. If you feel anything unsafe or complicated, call a professional for further repair.


